Friday, 16 December 2016

Sinigang na Salmon 🐟

Sometimes, my body is not cooperating with my brain. It's like it is unwilling to do any work. You felt heavy and idle. 

Lazy me😑

You know, I had this post saved up for quite some time now. Actually, not just this... But a bunch of it 😏 So, before I become a good-for-nothing again, let me share with you this dish that me and hubby shared by the early week of December.


Sinigang na Salmon


Ingredients:

4 pcs Salmon Fillet
String Beans
1 Eggplant
5 pcs Okra
1 Sheaf of Kangkong Leaves 
1 big Tomato
1 thumb Ginger
1 medium Onion
2 Finger Chilies
1 sachet of Knorr Sinigang sa Gabi mix 
1/2 sachet of Knorr Sinigang sa Sampaloc mix
Salt and Pepper
1-2 T Fish Sauce
3-4 cups of Water


Procedure:

Boil the water in a large pot. 
Once boiling, add the tomato, onion, ginger and let boil again for 5-8 minutes. 
Add the salmon, 2 finger chilies and fish sauce. Cover and cook over medium heat for 10 minutes.
Add  the knorr sinigang mix, okra, string beans, eggplant and simmer for another 5-10 minutes or until all vegetables added are well cooked.
Add salt and pepper to adjust the flavor to your liking.


So there you go... 
My Sinigang na Salmon recipe!
Enjoy dearS!

Mackerel Pasta 🍝

Pasta dinner last December 9th 👌

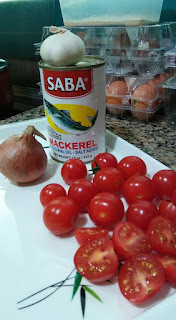
I cooked a simple and easy to prepare dish for my hubby a week back for dinner. We dropped by the grocery to grab some canned mackerel and cherry tomatoes for the pasta.

I'll be sharing with you a meal you can prepare for that busy-lazy day 👍


Mackerel Pasta
in Cherry Tomatoes

Ingredients:
1 15 oz can of Mackerel in Natural Oil
20 pcs Cherry Tomatoes
1 medium Onion
10 cloves of Garlic
Fettuccine Pasta (500 g)
Olive Oil
1/8 cube of Butter
Quick melt Cheese or Parmesan Cheese
Salt and Pepper


Procedure:

Boil water in a large pot; add 1 T of salt and 2 T of oil. Once boiling, add your preferred pasta and stir until 'Al Dente'. Or whatever suits you well; mine? I preferred it firm to the bite. Once cooked, drain the pasta and set aside in a strainer to draw off all liquids. After 10-15 minutes, smear the pasta with Olive Oil.


For the sauce:

Heat a wok with butter over medium heat. And as your butter melts, add the garlic and onion; stir until the onion becomes translucent. Then, add your sliced cherry tomatoes. Once the tomatoes are well cooked, add 1 can of  Mackerel in Natural Oil and seasoned with salt and pepper. Stir until all the flavors blends together.


Have fun in cooking! Everything starts with a little bit of experiment...


 Enjoy dearS!


Saturday, 3 December 2016

All about 'Nails' 💅

My November Nail Addiction... 

I was obsessed with nail acrylics months back and the idea of getting mine done with a coffin outline. I've watched videos of how to apply acrylics and the designs you can make out of it. 

My favorite YouTube nail artist are Naio Nails and Suzie, the woman behind Nail Career Education. If you're the type of person who loves edgy and artsy sculpted nail designs, you need to see Naio Nails artwork.  And if you're into posh and sophisticated look, go for Suzie. 

So, I went to one of these posh beauty salon in Sharjah and had my nails done in acrylic. I'm not sure if they had a promotion at that time but mine cost around 150AED. I tried calling other shops too and most of them offers acrylic nails starting 250AED depending on the design you'll choose. 

I chose the cheapest since I only wanted to try it. I can't afford to pay much then have them remove after just because I'm uncomfortable with it - you know what I mean?   

Off I went to Damas Beauty Center. 


#notmyphoto

When I went inside, I was greeted by a Filipina receptionist 😍. There were a lot of customers that time and I was next on the list for acrylic or extension application. I waited for 30 minutes (I think) since they only have 1 nail technician that day (and I'm not sure if she's the only one working for acrylics or whatnot).

So while waiting, I decided to take a few snap of the place... 


The inside is very elegant. I was amazed of how they decorated the place; it fits for a Princess.

The salon is spacious and they offer different services to their clients. A beauty haven for someone vain from head to toe.

If I get a chance to visit the place again, I'll make sure to take a few more shots and discuss services and offers from their management so I can share it with you. I'll make a separate blog for it with all necessary details you needed before getting one done for yourself. 


Take note, acrylic extensions normally lasts 2-3 weeks depending on how you maintain them and the type of nails you have, of course. 


Acrylics applied to my nails without the colored polish.
Application would usually take 1 hour or so.
I opt not to cut the length and decided to have it as it is when it was applied on top of my real nails; then the technician had it filed instead to fix the edges.
It look SO REAL!


The cut is what you called a 'Coffin Nails'. 
Mine is on dark mocha color.
If you choose to have a nail art or french gel tips, you have to pay extra.

After a week, I decided to change the color. haha 
Tadahhh... Gold!
I painted it myself. 

Which is something I regret... After a few days, the middle nail accidentally cracked while I'm doing the laundry. I think what I did ruined the top coat or protection applied by the tech.
Since I can't afford to let go of it yet, I decided to use a fake nail instead on my middle finger. 
Still looks good though!

I think I had the nails on for 2 weeks and decided to get rid of it already. I should have opted to cut the nails to medium length rather than have it that long?! I can't do anything... 😂😅

It's something I've learned in the process. The next time I'll have it done, it would be something I am sure I'll wear for a long period of time.

Overall, I love how my nails was done at that time. And if you'll ask me if I'll go back there for another beauty sesh? Sure thing I will ♥

Salon Location:
Damas beauty center

Al Sharq Street
Al Mirqaab area beside Matajer Mall Villa 999
Sharjah
(near Carrefour Matajer)

Note: this is not a sponsored blog.


Friday, 2 December 2016

Tata's Pancit Molo Soup

I grew up seeing the family making 'Pancit Molo' soup every time there's a gathering back home. This dish is a must in every Ilonggo party. As a kid, I consider myself an expert in wrapping pancit molo filling 😊 haha I learned how to cook the dish at a young age. 

A week back I decided to make one for my Dear. Actually, I've been craving for it so bad that even if the main ingredient is not available, I still pushed for it. We went for a quick shopping at Carrefour to buy the ingredients and tadahhh I failed with the wrapper I bought **dang It was so stiff that when I roll it, "fasten" and secure the wrapped molo balls, it started to cracked-up. But NO, I can't accept failure; I just can't waste food (I hate it huhu). Plan B then... I went to the other supermarket; which is just a few blocks from our place. And good thing I found an alternative. They have this Thai spring roll pastry and I think it's called 'Kulit Popiah'. The texture is a good substitute for the traditional molo wrapper; so I go for it.

This is my version of the famous Ilonggo Dish 💓

Ingredients:

Ground Beef
Ground Chicken 
10 pcs Prawns or Shrimp
1/2 K Chicken Liver
Spring Onion, chopped
2 Chicken Thighs for the broth
Eggs
2 Onions
12 cloves of Garlic
Soy Sauce & Fish Sauce
Dried peppercorn
Salt & Pepper to taste
Cooking Oil

Pancit Molo Balls (made from scratch 😉)
 1/2 K Ground Beef
1/4 K Ground Chicken
2 Eggs
1 Onion, finely chopped
8 cloves Garlic, finely chopped
2-3 T Soy Sauce
Salt & Pepper

Combine all ingredients for the Pancit Molo Balls. Then, prepare your spring roll wrap and a small bowl for the egg white (1 egg), which will be use for securing the wrapped molo balls.

If it's your first time to make a molo balls, you can taste your mixed ingredients by getting a portion fried. In that way, you still have time to alter the flavor.

How to wrap your Molo Balls 👌
Place a small portion of the meat mixture in one corner (quadrant) of the spring roll wrap. Roll until you reach the middle section. Take each corner across each other and fold the wrapper towards the center forming a triangle. Your molo balls should look like this 
👇
#photonotmine

You can cook your molo balls straight away or you can refrigerate it for 3-4 days. That's how long I keep mine before I fully consumed it. Besides, you can have it cooked in several ways; it can be steamed or fried same as dumplings and spring rolls.

For the Chicken Broth:

Put 3-4 cups of water in a pot. Add 2 chicken thighs and 10 pieces of Prawns or shrimp head. Let boil and turn off heat for cooling. Discard the shrimp heads and take away the chicken for shredding.

How to cook your Molo Soup?

Put 1T of oil in a deep cooking bowl; then sauté 4 cloves of garlic and 1 onion (both should be finely chopped). Once the onion becomes translucent, add the chicken liver and the shredded chicken. Mix well and add a tablespoon of fish sauce. Once the liver is well cooked, add the peeled shrimp or prawns. 
Now, it's time to add the chicken broth we made out of scratch! 
This time, turn your heat to medium level and let it boil. Once boiled, add the Molo Balls, a teaspoon of dried peppercorn and the spring onions. Continue boiling over low heat until your molo balls is cooked and the soup turns into a slightly thick consistency (I like mine that way). 
Maybe you wonder how your soup will thicken? That's because of the chicken liver added to the dish 😉
** note: if you do not eat chicken liver, you can opt not to add it.
To adjust the flavor to your liking, add a tablespoon of soy sauce, salt and pepper.


I'm glad my Dear loves the dish so much. He had it as his packed lunch as well. We shared it to our friends and guess what? They love it too. It got wiped out in a sec. haha 

My Dear's packed lunch... fried brown rice in egg and garlic, banana and my Pancit Molo Soup 😀
We made some into spring rolls too 😊😋


ENJOY MY dearS


Thursday, 1 December 2016

Beef Meat Bulalo


I had this weird feelings before while I'm still back home. It came to a point where I planned of hoarding stuffs I thought I will never find here (you know, I'm currently home away from home?) 😕😆

I said to myself "I need to buy this and that"... 'cos I really really thought  THEY DO NOT SELL IT HERE. How bad of me to ever think about that!?! But I WAS TOTALLY WRONG... Now? It's like I'm still 'HOME'. Everything I needed (well yeah, not everything) is just a few steps and turns away from me haha 

Especially the FOOD. 

I am so glad I still get to cook Fil dishes without worrying where to get my ingredients. 

I'm ready to share again with you the taste of Filo😋

I made my own version of Bulalo a few days back for my hubby. It's all beef muscle meat though since my guy is a very picky eater. He doesn't like buto-buto that much; and fats and that stuff you get inside of the animal? That's a total NO NO for him. 

So here's the ingredients we managed to get for this recipe (see up there? 👆 I said not everything is available here) 😑 


  1/2 K Beef
 1 Potato
1 Yellow Corn
1 Carrot
Pechay
Onion
Ginger
Beef cubes
1 T Fish Sauce 
Cooking oil
Dried Peppercorn
Salt and Pepper to taste
 
💗💗💗

Sauté onion and ginger in a hot pot with oil. Once the onion becomes translucent, add the beef. Simmer in low heat for 30 minutes to soften the meat. Then, stir the boiled meat with beef cubes, 1 T fish sauce and peppercorn. Simmer for another 15 minutes with half glass of water (I usually do this to really incorporate the flavor into the meat). After 15 minutes, turn heat to medium high as you'll be adding 2 cups of water and the corn. Let boil for another 15 minutes or until the corn is cooked; then you can add the chopped potatoes and carrots. Let boil for awhile then add salt and pepper to taste. Lower the heat again and add the pechay leaves. Let it simmer for 5 minutes more and turn off heat. 

Enjoy dearS 


wanDEARers' Ventures - - - Abra (Bur Dubai & Deira)

Whenever I visit a place and get fascinated by it; I always think of the past… then asked myself silently... How did people survive before...